Agreed that you can’t gain ultimate privacy on Chrome. However, you can still enhance privacy a little to have a peace of mind. Below I have provided 4 simple steps that can greatly enhance your privacy on Chrome without hindering your browsing experience.
Step 1: Encrypt synced data
By default, Chrome syncs everything with your connected Google account (i.e. Google servers) so you could access it from any device. The data includes bookmarks, passwords, autofill, apps, history, tabs, extensions, and pretty much everything in Chrome. If you are not comfortable with Google having access to all this data, then you can encrypt it with a personal password. Even Google won’t store this password, so this makes data only accessible to you. Here’s how to encrypt synced data.
Click on the Chrome main menu at the top-right corner and select “Settings”.
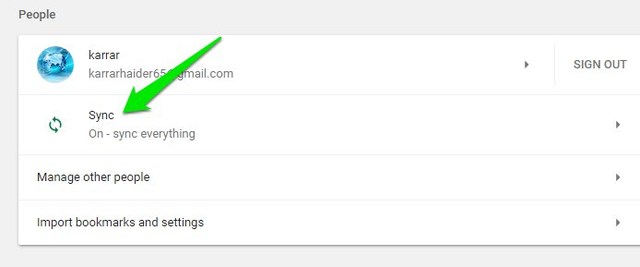
Here click on “Sync” under your Google account email address.
Now scroll to the bottom and select the option “Encrypt synced data with your own sync passphrase”.
Provide the passphrase you want to use to encrypt the data and click on “Save”.
Now whenever you need to sync Chrome data to a new device, you’ll have to provide this passphrase. Note: Only you know this passphrase and what data has been stored on Google servers. If you’ll forget the passphrase, you’ll have to reset the whole sync process and again upload data to Google servers.
Step 2: Replace default search engine
By default, Chrome uses Google Search as the default search engine. And most of the data it collects comes from Google Search history. If you don’t want Google to track you, then opting out of Google Search will remove a big part of privacy invasion. You can replace Google Search with a privacy-focused search engine. This will allow you to use Chrome’s features while still privately browse the web. I believe there is no better privacy-focused search engine than DuckDuckGo. This search engine never tracks any of your search queries and won’t save a history of what you search. All the search queries are anonymous and even the search results aren’t custom. If you are ready to give DuckDuckGo a try, here’s how to replace it as default search engine in Chrome.
Go to Chrome “Settings” from the main menu and click on “Manage search engines”.
Now click on “ADD” next to “Other search engines” section and fill the fields according to the below-provided data. Search engine: DuckDuckGo Keyword: http://duckduckgo.com URL with %s in place of query: https://duckduckgo.com/?q=%s&atb…
Once DuckDuckGo gets listed under Other search engines, click on the three vertical dots menu next to it and select “Make default”. Now all your queries will be answered using DuckDuckGo search engine.
Step 3: Optimize Chrome privacy settings
Now that the two main privacy concerns have been fixed, let’s go for small changes that could help enhance your privacy on Chrome. Chrome has a privacy section in the Settings where you’ll find all the options that could affect your privacy. Such as automatically sending your queries to Google, or even opening websites on your behalf without your knowledge. To access these privacy settings, go to Chrome “Settings” and click on “Advanced” button at the very bottom. If you want ultimate privacy then optimize these options like I have mentioned below. Although, if you depend on a particular service, then you can customize it according to your need.
Disable “Use a web service to help resolve navigation errors” Disable “Use a prediction service to help complete searches and URLs typed in the address bar”. Disable “Use a prediction service to load pages more quickly” Disable “Automatically send some system information and page content to Google to help detect dangerous apps and sites” Enable “Protect you and your device from dangerous sites” Disable “Automatically send usage statistics and crash reports to Google” Enable “Send a “Do Not Track” request with your browsing traffic” Disable “Use a web service to help resolve spelling errors”
In the same section, also go to Content Settings > Cookies and enable the option “Block third-party cookies”.
All the above changes will make it a little difficult for Google to harvest data and you’ll also decrease chances of being tracked by other websites.
Step 4: Get a Chrome privacy extension
If you want to go a step further, you can get a third-party extension to enhance privacy on Chrome. There are dozens of privacy extensions for Chrome, but most are unreliable or untrustable. Therefore, I have only picked two of the best Chrome privacy extensions that should be enough to enhance your privacy. You’ll find them below:
Privacy Badger
Privacy Badger is an open source (GitHub page) Chrome extension that focuses on blocking third-party trackers that even Chrome can’t block. Even if you enable “Do Not Track” request in Chrome (like we did above), there are still many websites that decline the request. Privacy Badger particularly hunts for those websites and blocks the trackers they are setting up.
Blur
Blur is a rather beefed up version of Privacy Badger that does more than just blocking third-party trackers. It has a built-in password manager to generate strong passwords and save them in encrypted form. It can also provide masked credit cards to pay online without ever giving up your credit card information. However, masked credit card and phone number feature are only available with a premium subscription.
Ending words
So these were 4 simple steps that are easy to follow and are most effective in strengthening your privacy on Chrome. I know there are many oth er options that could enhance Chrome privacy, such as disabling or deleting cookies. However, most of them heavily affect your browsing experience, which is why I have skipped them. All the 4 steps I have mentioned will let you browse the web and enjoy most of the Chrome features while still providing privacy.


