What is Vysor and What’s so special about it?
Unlike other applications, Vysor works as a Chrome extension and doesn’t require an Android app to be installed. It is mostly targeted at developers that are frustrated with the slow emulators for testing their apps and to provide a sublime experience, it needs your PC to have ADB and your phone to have USB debugging enabled. Both of those things are extremely straightforward to activate.
The main advantage Vysor carries with it right now is “Vysor Share”, it lets you share your Android screen with anyone who has Vysor installed over the internet and that user has the same ability to view and control the existing Vysor session which is just awesome if you’re working in a team. Sure there will be frame drops as it is buffering over the air and also because of the fact that Vysor is still in beta but it works for the most part.
How to Setup Vysor?
The process of setting up and using this utility is pretty basic, first thing and foremost thing to do is install “Vysor” chrome extension which won’t take long given the size.
Once that’s done, you’ll need to enable “USB Debugging” on your phone. If you’re an Android developer, then I’m sure there’s no need for explanation and others, don’t worry it’s not that tough. To enable USB Debugging, perform the following steps:
For the most users out there, installing ADB drivers was not necessary but in case things don’t work out, you can install ADB drivers by downloading this software and proceed with installing it.
Okay, the setup is completed now. Let’s move on to using Vysor.
Using Vysor.
As soon as you connect your Android phone to your computer, Vysor will automatically detect your device and will present a resizable window that’s projecting your smartphone’s screen. You can operate on it, move it and even use Desktop shortcuts on Windows/Mac for back, home, and multitasking.
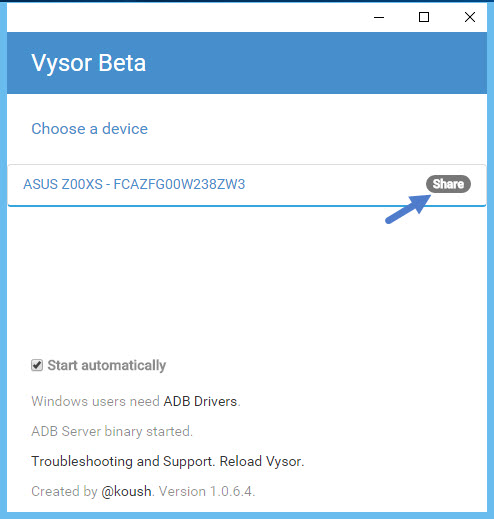
The next thing you should get familiar with is “Vysor Share”. This feature allows you to view or control someone else’s Vysor session, for this, you’ll need the link to their device or send a link if you’re sharing. To get the link, open the Vysor app and you will see that your phone is already listed. Click on the gray “Share” oval button on the right of your device and Vysor will generate a link for you to share. After that, the other person can simply open the link and start working. Neat, huh?
So that’s all you need to know about “how to use and setup Vysor”, as I said earlier, the app makes things a lot simpler when compared to other similar services. If Vysor is not detecting your device for some reason, make sure you have the right ADB drivers installed and USB debugging is working. If you have any queries, comment down below and we’ll get back as soon as possible.