For the sake of this article, I am assuming that you already have your own watermark available with you in image format, if not then you can create one in any image editing software like Google Drawing, MS Paint, etc. This article has three parts, in the first part, I will show how to insert a watermark in Google Docs, In the second part I will show how to remove a watermark from Google Docs, and in the last part I will show how to add watermarks to images in Google Docs. So let’s get on with it.
Adding a watermark to Google Docs pages
Step 1: First you need to launch Google Docs in any browser of your choice and start with a blank document. Step 2: Now you need to click on the “Insert” menu, which will cause a drop-down menu to appear. In this drop-down menu, click on “Watermark”.
Step 3: The previous step will cause the “Watermark” pane to appear to the left of your screen. In this pane click on “Select Image” as shown below.
Step 4: You need to specify the location of your image file that you want to use as a watermark in Google Docs. To upload it from your computer click on “Upload” and then “Browse”.
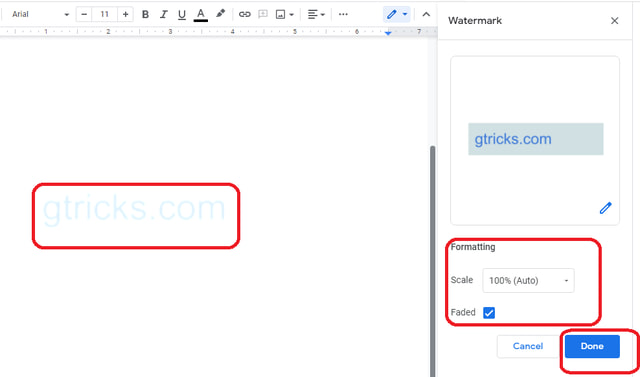
Step 5: Browse to your required file, select it and click on “Open”. Step 6: That’s it, your watermark is now inserted in Google Docs. You can position your watermark by double-clicking it and dragging it around. You can also change its Scale and Fade from the watermark pane as shown below. When you are satisfied click on the “Done” button towards the lower left.
Removing the watermark from Google Docs
If you later decide you want to remove the watermark or need to use a different one instead, then you should know how to remove the watermark from Google Docs. Here’s how: Step 1: You just need to open the document and click on the “Insert” menu and “Watermark” to display the watermark pane if not displayed already Step 2: In the watermark pane, click on “Remove Watermark” at the bottom as shown in the following figure. This will remove your watermark from all pages of the Google Docs document.
Adding a watermark to an image in Google Docs
To add a watermark to an image in Google Docs, you need to use the Drawing feature to upload two images one being the base and the other being watermark. Let’s see how to do it: Step 1: Click on the “Insert” menu, point to “Drawing” and then click on “New”.
Step 2: In the “Drawing” window click on the “Image” icon as shown below.
Step 3: A new window will appear. In this window, click on “Choose an image to upload”. Browse to the storage location of the image you want to watermark (in my case I am using the screenshot of our web page) and click “Open”. When uploaded, the image will be available in the Drawing app.
Step 4: Next you need to upload your watermark. To do this follow steps 1 and 2 exactly as in this section but in step 3 select the watermark to upload. Now the watermark will appear above the image. You can resize and reposition both the watermark and the image itself as needed. Once satisfied, click on “Save and Close” in the upper right corner of the Drawing app. The process is now complete and the watermarked image is now inserted in Google Docs.
Ending words
Google Docs watermark feature is definitely very useful for quickly adding watermarks to Google Docs pages. However, it’s a bit difficult to add watermarks to images as you need to use the workaround of using the drawing tool. Until Google officially adds a way to add watermarks to images, this workaround will do fine.