But some apps do not need to connect to the Internet so frequently for their functionality as their unneeded data transfers can result in some undesirable consequences for the user such as mobile phone balance shocks, security concerns, unwanted notifications, and advertisements. This article is about how you can allow certain apps to access the Internet and restrict or block the ones with unwanted data transfers. Let’s start with how this can be done natively in Android without the need for additional third-party software first. Afterward, I will also discuss the use of a third-party tool for this purpose.
Blocking Internet access for selective apps using Android Settings
It must be noted that the names and categories of the options might be different in your case due to different versions of the Android operating system and its skins. In my case, I am using a Realme device with Android 11. To restrict the internet access of some apps to a particular network such as Wi-Fi or to block their Internet access completely from Android settings, follow step by step the following procedure. Step 1: Tap on the gear icon to go to the Settings of your phone. Step 2: On the next screen tap on the “SIM card and mobile data” option. Step 3: Next tap on the “Data usage” option. Step 4: Now tap on the “Network permissions”.
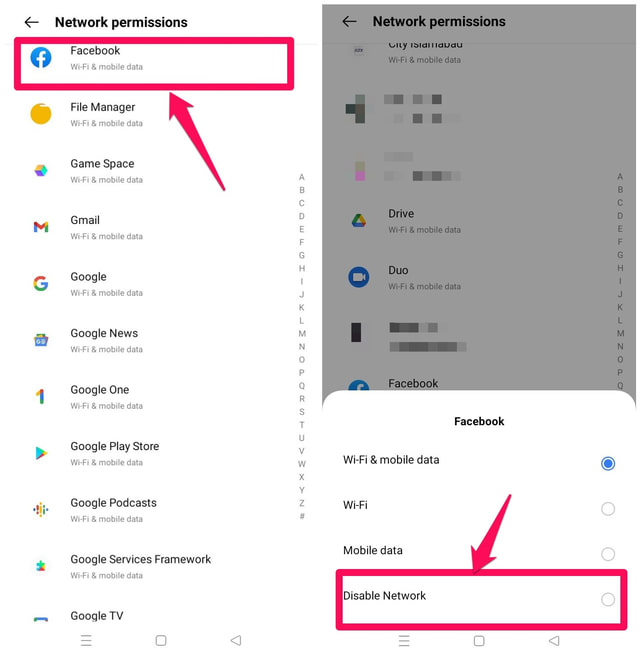
Step 5: Scroll down and find the application you want to restrict or block the Internet access for and tap on it. For demonstration, I am blocking Facebook. Step 6: Tap on Wi-Fi, if you want to restrict the app to use the Wi-Fi network only or tap on the “Disable Network” option to block it completely from accessing the Internet.
Step 7: After blocking when you run the app for the first time you will get an option to restore its connectivity or to keep it blocked. Tap on “Keep Disabled” to confirm its blocked status.
Blocking Internet access for selective apps using third-party apps
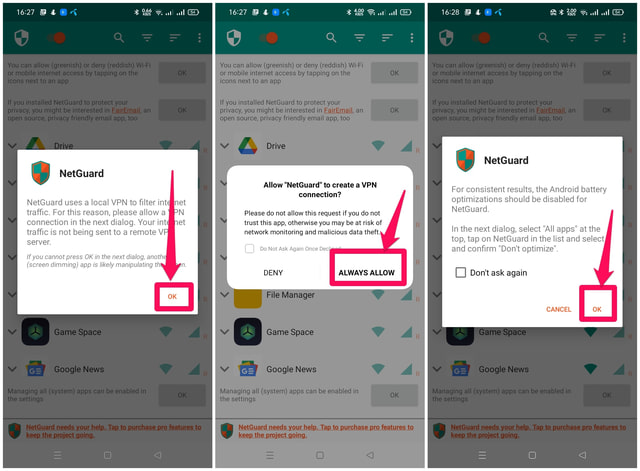
There are third-party apps on the Google Play Store which you can use to allow only selected apps to access the Internet, one such app is NetGuard – no-root firewall. Install the app and follow the following instructions to block apps with unwanted Internet access. Step 1: Run the app, read the privacy policy carefully and afterward tap on “I AGREE”. Step 2: Next allow the app necessary permission for setting up a local VPN and to remove the app from the list of battery-optimized apps. Step 3: When the app setup is finally complete, it’s necessary to enable the app before it can be used, by clicking on the toggle button on the upper left of the screen.
Step 4: The app’s main interface will show all the applications installed on your phone. By default, all applications will have green icons to their right showing that they have access to the Internet using both Wi-Fi and data networks. Step 5: To block a particular app on a specific network such as Wi-Fi or 4G tap on the related icon in front of it to the right or tap on both the Wi-Fi and 4G icons if you wish to block the app completely. Facebook in my case.
Wrapping up
A user might have more than one reasons to gain control over the Internet access of the apps he/she is using. In this article, I have discussed two methods of selectively blocking Internet access for mobile apps. While it’s easy to block the Internet access of certain apps from Android settings, using a third-party app like NetGaurd might be preferable due to the finer controls and a variety of options it provides on controlling the Internet access of Android apps. Do let us know in the comments if you know of any other easier way to block internet access of individual apps on Android.